Showing posts with label Embedded Linux. Show all posts

Wednesday, November 27, 2013

PPP connection trouble shooting

[1] http://rsc.anu.edu.au/General/linux_ppp/ANU-PPP-HOWTO-5.html

From [1]
 A Working pppd Connection
The following is the output you should see from various commands while a correctly configured ppp connection is open.
ambceal@anuhost 1> last | head -1
amcbeal     pts/1        h138.anu.uniras. Sat Apr 17 10:50   still logged in
If other people have logged onto the ANU host after you, use
last | less   instead.
Your computer at home should show something like the following. With no ppp connection, the lo section would be the only part displayed.
amcbeal [home] 165> ifconfig
lo        Link encap:Local Loopback  
          inet addr:127.0.0.1  Mask:255.0.0.0
          UP LOOPBACK RUNNING  MTU:3924  Metric:1
          RX packets:6 errors:0 dropped:0 overruns:0 frame:0
          TX packets:6 errors:0 dropped:0 overruns:0 carrier:0
          collisions:0 

ppp0      Link encap:Point-to-Point Protocol  
          inet addr:203.108.55.138  P-t-P:203.108.192.15  Mask:255.255.255.255
          UP POINTOPOINT RUNNING NOARP MULTICAST  MTU:1500  Metric:1
          RX packets:9 errors:0 dropped:0 overruns:0 frame:0
          TX packets:10 errors:0 dropped:0 overruns:0 carrier:0
          collisions:0 
If you are on the slower subnet, the first part of the ppp0 section will show a different subnet for "inet addr"...
ppp0      Link encap:Point-to-Point Protocol  
          inet addr:203.108.192.94  P-t-P:203.108.192.14  Mask:255.255.255.255

The output from route on your computer at home.
Without a ppp connection, only the loopback route (127.0.0.0) is shown.
   
amcbeal [home] 163> route
Kernel IP routing table
Destination     Gateway         Genmask         Flags Metric Ref    Use Iface
termcan2.ozemai *               255.255.255.255 UH    0      0        0 ppp0
127.0.0.0       *               255.0.0.0       U     0      0        0 lo
default         termcan2.ozemai 0.0.0.0         UG    0      0        0 ppp0

Debugging Output Written to /var/log/ppplog

The actual output looks like this...
Apr 20 15:57:58 localhost pppd[479]: pppd 2.3.5 started by root, uid 0
...however I've removed the date and hostname for brevity.
The first part is the output from chat.
pppd[479]: pppd 2.3.5 started by root, uid 0
chat[480]: send (AT^M)
chat[480]: expect (OK)
chat[480]: AT^M^M
chat[480]: OK
chat[480]:  -- got it 
chat[480]: send (ATDT 62578155^M)
chat[480]: expect (CONNECT)
chat[480]: ^M
chat[480]: ATDT 62578155^M^M
pppd[479]: Serial connection established.
chat[480]: CONNECT
chat[480]:  -- got it 
Now it switches to ppp.   Some of the abreviations it uses are:
LCP   Link Control Protocol
PAP   Password Authentication Protocol
IPCP   Internet Protocol Control Protocol
pppd[479]: Using interface ppp0
pppd[479]: Connect: ppp0 <--> /dev/modem
pppd[479]: sent [LCP ConfReq id=0x1 <magic 0x8c5561c2> <pcomp> <accomp>]
pppd[479]: rcvd [LCP ConfReq id=0x1 <asyncmap 0x0> <auth pap> <magic 0x3a9e2b78> <pcomp> <accomp>]
pppd[479]: sent [LCP ConfAck id=0x1 <asyncmap 0x0> <auth pap> <magic 0x3a9e2b78> <pcomp> <accomp>]
pppd[479]: sent [LCP ConfReq id=0x1 <magic 0x8c5561c2> <pcomp> <accomp>]
pppd[479]: rcvd [LCP ConfAck id=0x1 <magic 0x8c5561c2> <pcomp> <accomp>]
pppd[479]: sent [PAP AuthReq id=0x1 user="amcbeal" password="ca1op3x"]
pppd[479]: sent [PAP AuthReq id=0x2 user="amcbeal" password="ca1op3x"]
pppd[479]: rcvd [PAP AuthAck id=0x1 ""]
pppd[479]: Remote message: 
pppd[479]: sent [IPCP ConfReq id=0x1 <addr 0.0.0.0> <compress VJ 0f 01>]
pppd[479]: rcvd [IPCP ConfReq id=0x2 <compress VJ 0f 01> <addr 203.108.192.14>]
pppd[479]: sent [IPCP ConfAck id=0x2 <compress VJ 0f 01> <addr 203.108.192.14>]
pppd[479]: rcvd [IPCP ConfNak id=0x1 <addr 203.108.55.26>]
pppd[479]: sent [IPCP ConfReq id=0x2 <addr 203.108.55.26> <compress VJ 0f 01>]
pppd[479]: rcvd [IPCP ConfAck id=0x2 <addr 203.108.55.26> <compress VJ 0f 01>]
pppd[479]: local  IP address 203.108.55.26
pppd[479]: remote IP address 203.108.192.14
The following appears after you close the connection with /etc/ppp/scripts/ppp-off
pppd[479]: Terminating on signal 2.
pppd[479]: sent [LCP TermReq id=0x2 "User request"]
pppd[479]: rcvd [LCP TermAck id=0x2]
pppd[479]: Connection terminated.
pppd[479]: Exit.

ppplog Output from a Working pppd Connection using CHAP

pppd[1160]: pppd 2.4.0 started by root, uid 0
chat[1161]: abort on (BUSY)
chat[1161]: abort on (ERROR)
chat[1161]: abort on (NO CARRIER)
chat[1161]: abort on (NO DIALTONE)
chat[1161]: abort on (Invalid Login)
chat[1161]: abort on (Login incorrect)
chat[1161]: send (AT^M)
chat[1161]: expect (OK)
chat[1161]: AT^M^M
chat[1161]: OK
chat[1161]:  -- got it
chat[1161]: send (ATDT62617444^M)
chat[1161]: expect (CONNECT)
chat[1161]: ^M
chat[1161]: ATDT62617444^M^M
chat[1161]: CONNECT
chat[1161]:  -- got it
pppd[1160]: Serial connection established.
pppd[1160]: using channel 1
pppd[1160]: Using interface ppp0
pppd[1160]: Connect: ppp0 <--> /dev/modem
pppd[1160]: sent [LCP ConfReq id=0x1    ]
pppd[1160]: rcvd [LCP ConfReq id=0x1 < 00 04 00 00>       ]
pppd[1160]: sent [LCP ConfRej id=0x1 < 00 04 00 00> ]
pppd[1160]: rcvd [LCP ConfAck id=0x1    ]
pppd[1160]: rcvd [LCP ConfReq id=0x2      ]
pppd[1160]: sent [LCP ConfAck id=0x2      ]
pppd[1160]: rcvd [CHAP Challenge id=0x1 , name = "tnt3.cbr1"]
pppd[1160]: sent [CHAP Response id=0x1 , name = "amcbeal@ozemail.com.au"]
pppd[1160]: rcvd [CHAP Success id=0x1 "\000"]
pppd[1160]: Remote message: ^@
pppd[1160]: sent [IPCP ConfReq id=0x1  ]
pppd[1160]: sent [CCP ConfReq id=0x1   ]
pppd[1160]: rcvd [IPCP ConfReq id=0x1  ]
pppd[1160]: sent [IPCP ConfAck id=0x1  ]
pppd[1160]: rcvd [IPCP ConfNak id=0x1 ]
pppd[1160]: sent [IPCP ConfReq id=0x2  ]
pppd[1160]: rcvd [LCP ProtRej id=0x3 80 fd 01 01 00 0f 1a 04 78 00 18 04 78 00 15 03 2f]
pppd[1160]: rcvd [IPCP ConfAck id=0x2  ]
pppd[1160]: local  IP address 210.84.37.27
pppd[1160]: remote IP address 210.84.63.40
pppd[1160]: Script /etc/ppp/ip-up started (pid 1180)
pppd[1160]: Script /etc/ppp/ip-up finished (pid 1180), status = 0x0

If your chap-secrets file is missing or incorrect, you might see something like this after it switches to ppp: 
pppd[3370]: Serial connection established.
pppd[3370]: using channel 1
pppd[3370]: Using interface ppp0
pppd[3370]: Connect: ppp0 <--> /dev/modem
pppd[3370]: sent [LCP ConfReq id=0x1    ]
pppd[3370]: rcvd [LCP ConfReq id=0x1 < 00 04 00 00>       ]
pppd[3370]: sent [LCP ConfRej id=0x1 < 00 04 00 00> ]
pppd[3370]: rcvd [LCP ConfAck id=0x1    ]
pppd[3370]: rcvd [LCP ConfReq id=0x2      ]
pppd[3370]: sent [LCP ConfAck id=0x2      ]
pppd[3370]: rcvd [CHAP Challenge id=0x1 , name = "tnt3.cbr1"]
pppd[3370]: No CHAP secret found for authenticating us to tnt3.cbr1
pppd[3370]: sent [CHAP Response id=0x1 <68937d227c92b8d9b8b7f64d83214a1a>, name = "amcbeal"]
pppd[3370]: rcvd [CHAP Failure id=0x1 "\000"]
pppd[3370]: Remote message: ^@
pppd[3370]: CHAP authentication failed
pppd[3370]: sent [LCP TermReq id=0x2 "Failed to authenticate ourselves to peer"]
pppd[3370]: rcvd [LCP TermAck id=0x2]
pppd[3370]: Connection terminated.
pppd[3370]: Exit.
If you try to connect to a server and the string <auth chap 80> shows up in the ppplog file, it probably means the server is using a Microsoft variation of CHAP called MSCHAP. You will need to recompile pppd to support this. See README.MSCHAP80 in the pppd source. Fortunately OzEmail does not use MSCHAP so I haven't had to deal with it.

Previous Contents Next

Wednesday, August 14, 2013

Open Source USB Packet capture for Windows ... works on XP, Vista, 7 and 8


[1] USBPcap

USB Packet capture for Windows Tour

This short tour assumes you have installed the latest version of USBPcap and the patched version of Wireshark and rebooted your system. Each of the steps contains short description of what should happen and in some cases gives tips for troubleshooting.
If you feel the information provided there is not complete (it doesn't cover your case), please describe your problem on the USBPcap mailing list.

Step 1 - identify the Root Hub you want to monitor

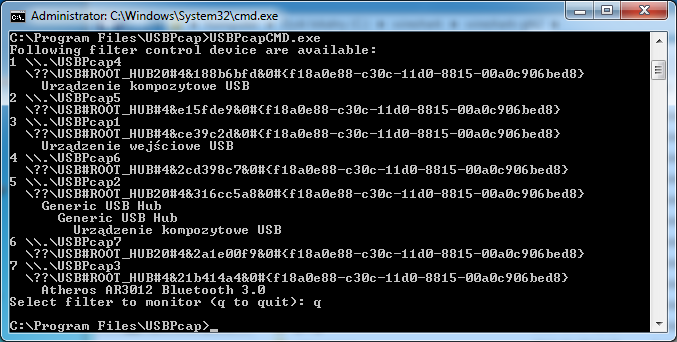
The first step is to connect the device you want to sniff the traffic and identify the Root Hub this device is connected to. In order to do so, launch the USBPcapCMD.exe that is stored in the installation directory. You should be presented with something similiar to the picture below.

Troubleshooting step 1

If for any reason you can't see the list of connected devices make sure you have the USBPcap driver installed and you have restarted your computer after the installation. Please note that if running on 64-bit Windws it is required to run in Test Mode.

Step 2 - start the capture

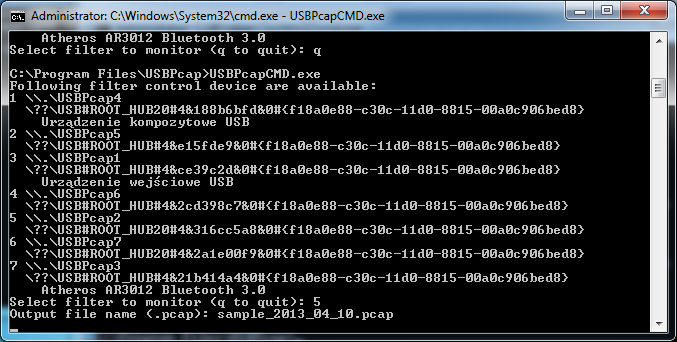
So now you know which of the Root Hubs available in your system you want to monitor. Please disconnect the device from your computer - this will allow USBPcap to capture the USB descriptors needed for analysis in Wireshark. Now you can run the USBPcapCMD.exe again and enter your desired output file name. (A careful reader will notice that they can skip the restart part: all that required to get the descriptors in the capture file is to reconnect your device after capture has started.).
We will be capturing the Root Hub that showed the two Hubs connected to it and an composite USB device (it is actually DigiTech RP250).
Now it is time to use the device in order to get packets captured. In this example I have simply started the X-Edit software that controls the DigiTech RP250.

Step 3 - analyse the data

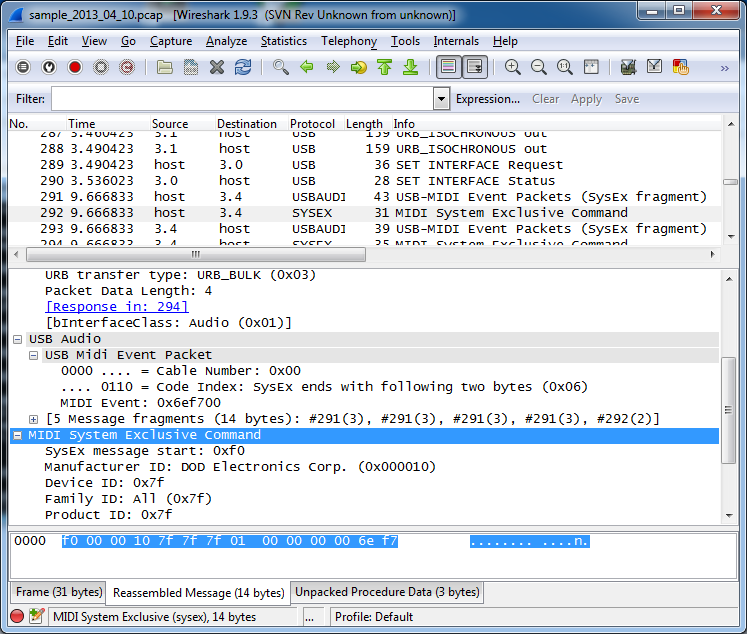
After you're done collecting data, press Ctrl+C and start Wireshark. Once started, open the pcap file you have created in Step 2. You should see the packets allongside with their description. The sample capture is available at the Google code:sample_2013_04_10.pcap

Step 4 - live capture

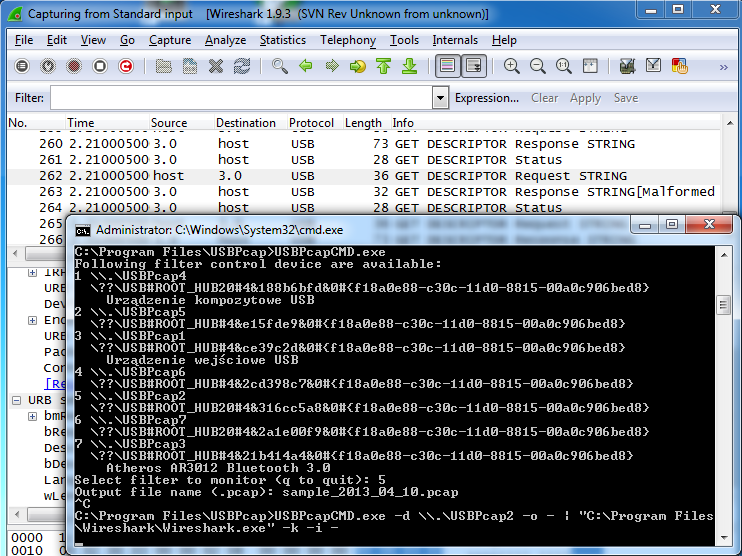
If you didn't like that in steps 2 and 3 you had to finish capturing before having a chance to look at the data, you can also do a live capture. In order to do so, you must have running the cmd.exe with elevated privileges (as Administrator). Then enter the following command:
USBPcapCMD.exe -d \\.\USBPcap2 -o - | "C:\Program Files\Wireshark\Wireshark.exe" -k -i -
This should result in live capture from standard input in Wireshark as shown below.

Step 5 - Contribute to the project :-)

Once you know how to use USBPcap you might want it to work better. There are numerous ways to help, for example:
  • Improving project website
  • Improving the documentation
  • Improving the filter driver
  • Improving the sample application
  • Improving installation process
  • Creating project artwork (icon, website banner, etc.)
  • Integrating the project more closely with Wireshark (dumpcap)
  • Donating money
If you can help please check the menu on the right for links for github page, donation fund and contact information.

Monday, March 25, 2013

CmdLine --- check boot command line option


$cat /proc/cmdline

Changing default password and build it into RFS


1.       Run passwd – change root password
2.       Run passwd user – change ‘user’ password
3.       Copy /etc/shadow file into root filesystem

Thursday, November 15, 2012

Curl web service libarary


http://curl.haxx.se/libcurl/c/https.html

Talking to 3G USB Sierra Modem Under Linux


[root@GsnCommsModule root]# cat /dev/ttyUSB4 &
[1] 601
[root@GsnCommsModule root]# cat > /dev/ttyUSB4
AT!SELRAT?


OK

AT!SELRAT=?


OK

AT!GETBAND?


OK


Monday, November 12, 2012

Sunday, February 26, 2012

How to generate patch under Linux

[1] Linux byexamples


First, how to create patch file?
------------------------------------
Patch file is a readable file that created by diff with -c (context output format). It doesn’t matter and if you wanna know more, man diff. To patch the entire folder of source codes(as usually people do)I do as bellow:

Assume Original source code at folder Tb01, and latest source code at folder Tb02. And there have multiple sub directories at Tb01 and Tb02 too.

diff -crB Tb01 Tb02 > Tb02.patch


-c context, -r recursive (multiple levels dir), -B is to ignore Blank Lines.
I put -B because blank lines is really useless for patching, sometimes I need to manually read the patch file to track the changes, without -B is really headache.

How to patch?
-------------------------
First of all, please do a dry-run before really patch it. Bare in mind, patch will be working very specifically. Let say the version 3 Tb03.patch is use to patch from Tb02, if you apply patch on Tb01, sometimes it will corrupt your source code. So, to make sure it works, do a dry run. Dry-run means a fake-test, do it at the directory of the source code targeted to patch.

Doing dry-run like this:

patch --dry-run -p1 -i Tb02.patch

The success output looks like this:

patching file TbApi.cpp
patching file TbApi.h
patching file TbCard.cpp
...

The failure ouptut looks like this:

patching file TbCard.cpp
Hunk #2 FAILED at 585.
1 out of 2 hunks FAILED -- saving rejects to file TbCard.cpp.rej
patching file TbCard.h
Hunk #1 FAILED at 57.
Hunk #2 FAILED at 77.
Hunk #3 succeeded at 83 with fuzz 1 (offset -21 lines).
....

At last, if the dry-run is giving good result, do this and enjoy the compilation.

patch -p1 -i Tb02.patch

References:
1. Network Theory Ltd Patch Intro
2. How to create and use a patch in Linux

Sunday, January 8, 2012

Changing MAC address under Linux Command Line

[1] Ref


$ ifconfig -a | grep HWaddr
eth0  Link encap:Ethernet HWaddr 00:80:48:BA:d1:20
 

# ifconfig eth0 down
# ifconfig eth0 hw ether 00:80:48:BA:d1:30
# ifconfig eth0 up
# ifconfig eth0 |grep HWaddr
 
 
In Linux, Windows, Mac OS X, or a different operating system
changing MAC address is only temporary. 
 
Once you reboot your machine, the operating system reflects the 
physical MAC address burnt in your network card and not the MAC address you set.
 

Thursday, January 5, 2012

Set Time and Date under Linux

[1] Linuxsa.org

Setting the system clock

To set the system clock under Linux, use the date command. As an example, to set the current time and date to July 31, 11:16pm, type ``date 07312316'' (note that the time is given in 24 hour notation). If you wanted to change the year as well, you could type ``date 073123161998''. To set the seconds as well, type ``date 07312316.30'' or ``date 073123161998.30''. To see what Linux thinks the current local time is, run date with no arguments.

Setting the hardware clock

To set the hardware clock, my favourite way is to set the system clock first, and then set the hardware clock to the current system clock by typing ``/sbin/hwclock --systohc'' (or ``/sbin/hwclock --systohc --utc'' if you are keeping the hardware clock in UTC). To see what the hardware clock is currently set to, run hwclock with no arguments. If the hardware clock is in UTC and you want to see the local equivalent, type ``/sbin/hwclock --utc''

Wednesday, December 28, 2011

FW: File size limit exceeded error under Linux and solution

[1] From Cyberciti.biz

File size limit exceeded error under Linux and solution

$ulimit -a

core file size (blocks, -c) 0
data seg size (kbytes, -d) unlimited
file size (blocks, -f) unlimited
max locked memory (kbytes, -l) 64
max memory size (kbytes, -m) unlimited
open files (-n) 1024
pipe size (512 bytes, -p) 8
stack size (kbytes, -s) 8192
cpu time (seconds, -t) unlimited
max user processes (-u) 227
virtual memory (kbytes, -v) unlimited

Wednesday, September 21, 2011

Read and parse ini file in C++


[1] A couple of tools to read and parse ini file.
[2]Stackoverflow Q&A for programmers.
[3] WiKi page on introduction of 'ini' file.
[4] SimpleIni library that support Window,WinCE, Linux


ini file is commonly used for configuration storage. So it can replace binary data you stored in EEPROM for configuration purpose once you system is supporting file system.


RUNNING SIMPLEINI ON LINUX TARGET BOARD
------------------------------------------

[q.yang@localhost Sample_023_SimpleIni_FileReader]$ cat Makefile
PROGRAM=testsi
DEBUG = -g
CFLAGS = -Wall -c $(DEBUG)
INCL = -I $(LTIB_LINUX_KERNEL_PATH)/include

CC=g++
CFLAGS=-Wall
CPPFLAGS=-Wall

OBJS=testsi.o test1.o snippets.o ConvertUTF.o

help:
@echo This makefile is just for the test program \(use \"make clean all test\"\)
@echo Just include the SimpleIni.h header file to use it.

all: $(PROGRAM)

$(PROGRAM): $(OBJS)
$(CC) -o $(PROGRAM) $(OBJS)

./%.o:./%.cpp
$(CC) -c $(CFLAGS) $< -o $@ $(INCL)

clean:
rm -f core *.o $(PROGRAM)

data:
sed 's/\r\n$$/\n/g' < test1-expected.ini > unix.out
mv unix.out test1-expected.ini

test: testsi
./testsi -u -m -l test1-input.ini > test1-blah.ini
diff test1-output.ini test1-expected.ini

install:
@echo No install required. Just include the SimpleIni.h header file to use it.

testsi.o test1.o snippets.o : SimpleIni.h


SAMPLE CODE TO USE SIMPLEINI
-----------------------------------
Load *.ini file pointed by 'pszFile'


const TCHAR * pszFile;
bool bIsUtf8, bUseMultiKey, bUseMultiLine;

TestGateWayCfg(pszFile, bIsUtf8, bUseMultiKey, bUseMultiLine);

static bool TestGateWayCfg(const TCHAR *a_pszFile,bool a_bIsUtf8,bool a_bUseMultiKey,bool a_bUseMultiLine)
{
//----CSimpleIni GateWayCfgIni(a_bIsUtf8, a_bUseMultiKey, a_bUseMultiLine)-------------------
//---------------GateWayCfgIni.LoadFile(a_pszFile)-------------------------------------------
// load the file
CSimpleIni GateWayCfgIni(a_bIsUtf8, a_bUseMultiKey, a_bUseMultiLine);
_tprintf(_T("Loading file: %s\n"), a_pszFile);
SI_Error rc = GateWayCfgIni.LoadFile(a_pszFile);
if (rc < 0) {
printf("Failed to open file.\n");
return false;
}

//Read and print out values read from all keys
//All keys,values,comments will be buffered in instanse of 'GateWayCfgIni'.
_tprintf(_T("\n\n\n\n-----------scan and display all key and values-----------------\n"));
QuentinScanIniFile(GateWayCfgIni);
}


'GateWayCfgIni' stores a clone copy of all comments,sections,keys and values of *.ini file.

Analyze and display sections, keys, values in *.ini file.


static void QuentinScanIniFile(CSimpleIni &ini)
{
const TCHAR *pszSection = 0;
const TCHAR *pItem = 0;
const TCHAR *pszVal = 0;

//------GetValue-======-------------------------------------------
// get the value of the key "LogLevel" in section "ManufactureCfg"
bool bHasMulti;
pszVal = ini.GetValue(_T("ManufactureCfg"), _T("LogLevel"), 0, &bHasMulti);
_tprintf(_T("\n-- Value of ManufactureCfg::LogLevel is '%s' (hasMulti = %d)\n"),
pszVal ? pszVal : _T("(null)"), bHasMulti);

//------GetSectionSize-----------------------------------------------
// get the size of the section [ManufactureCfg]
_tprintf(_T("\n-- Number of keys in section [ManufactureCfg] = %d\n"),
ini.GetSectionSize(_T("ManufactureCfg")));

//------GetAllKeys------------------------------------------------
// get the list of all key names for the section "ManufactureCfg"
_tprintf(_T("\n-- Dumping keys of section: [ManufactureCfg]\n"));
CSimpleIni::TNamesDepend keys;

ini.GetAllKeys(_T("ManufactureCfg"), keys);
// dump all of the key names
CSimpleIni::TNamesDepend::const_iterator iKey = keys.begin();
for ( ; iKey != keys.end(); ++iKey ) {
pItem = iKey->pItem;
_tprintf(_T("Key: %s\n"), pItem);
}

//------GetAllSections------------------------
// iterate through every section in the file
_tprintf(_T("\n-- Dumping all sections\n"));
CSimpleIni::TNamesDepend sections;

ini.GetAllSections(sections);
CSimpleIni::TNamesDepend::const_iterator iSection = sections.begin();
for ( ; iSection != sections.end(); ++iSection ) {
pszSection = iSection->pItem;

// print the section name
printf("\n");
if (*pszSection) {
_tprintf(_T("[%s]\n"), pszSection);
}

// if there are keys and values...
const CSimpleIni::TKeyVal * pSectionData = ini.GetSection(pszSection);
if (pSectionData) {
//-------------------------------------------------------
// iterate over all keys and dump the key name and value
CSimpleIni::TKeyVal::const_iterator iKeyVal = pSectionData->begin();
for ( ;iKeyVal != pSectionData->end(); ++iKeyVal) {
pItem = iKeyVal->first.pItem;
pszVal = iKeyVal->second;
_tprintf(_T("%s=%s\n"), pItem, pszVal);
}
}
}
}

Monday, September 19, 2011

Watchdog in Embedded Linux

[1] Embedded Freak

To use watchdog peripheral in Linux, you will need:
Watchdog driver: Most of board suppliers will provide you for free (ask their support if you need to). This article is using EA3131 Linux BSP’s provided watchdog driver.
Watchdog device file: Device file is a special kind of file to mark the device node in your root filesystem (so you can access the peripheral like accessing file..’everything is a file’ in UNIX system). Normally it is called ‘/dev/watchdog’

RESULT OF RUNNING DEMO FROM [1] ON LPC3240 BOARD
---------------------------------------------------
[root@LIQ-GateWay user]# ./WatchDogTest
Current watchdog interval is 19
Last boot is caused by : Power-On-Reset
Use:
< w > to kick through writing over device file
< i > to kick through IOCTL
< x > to exit the program
w
Kick watchdog through writing over device file
Unknown command
w
Kick watchdog through writing over device file
Unknown command
i
Kick watchdog through IOCTL
Unknown command
i
Kick watchdog through IOCTL
Unknown command

Monday, August 22, 2011

Java call C function

[1] One Pdf document 'Java call C via JNI'
[2] Sun link of using JNI
[3] Java call C on power PC
[4] Sun book of JNI
[5] JNI and JNA in Wiki
[6] JNA intro on wiki
[7] where to download jna.jar

The JNA library uses a small native library called foreign function interface library (libffi) to dynamically invoke native code. [6]


Java Native Interface[5]

The Java Native Interface has a high overhead associated with it, making it costly to cross the boundary between code running on the JVM and native code.[69][70] Java Native Access (JNA) provides Java programs easy access to native shared libraries (DLLs on Windows) without writing anything but Java code—no JNI or native code is required. This functionality is comparable to Windows' Platform/Invoke and Python's ctypes. Access is dynamic at runtime without code generation. But it comes with a cost and JNA is usually slower than JNI.[71]

Wednesday, July 6, 2011

CmdLine ----- Check Public IP address

[1] http://www.simplehelp.net/2009/04/07/how-to-find-your-public-ip-address-with-the-linux-command-line/

[root@GsnCommsModule /]# wget -q -O - http://checkip.dyndns.org
...Current IP Check Current IP Address: 1.152.83.93...

wget -q -O - checkip.dyndns.org|sed -e 's/.*Current IP Address: //' -e 's/<.*$//'

Tuesday, July 5, 2011

ntpclient NTP used in Embedded Linux

[1] http://doolittle.icarus.com/ntpclient/README


ntpclient home page: http://doolittle.icarus.com/ntpclient/

Joachim Nilsson created a fork of ntpclient that he maintains at
http://vmlinux.org/jocke/ntpclient.shtml. We don't have the same
maintainance and build system sensibilities; some people may prefer his.
In particular, he has converted his ntpclient to daemon and syslog.
The basic functionality of the two versions should be identical.

Usage: ntpclient [options]
options:
-c count stop after count time measurements (default 0 means go forever)
-d print diagnostics (feature can be disabled at compile time)
-g goodness causes ntpclient to stop after getting a result more accurate
than goodness (microseconds, default 0 means go forever)
-h hostname (mandatory) NTP server, against which to measure system time
-i interval check time every interval seconds (default 600)
-l attempt to lock local clock to server using adjtimex(2)
-p port local NTP client UDP port (default 0 means "any available")
-q min_delay minimum packet delay for transaction (default 800 microseconds)
-r replay analysis code based on stdin
-s simple clock set (implies -c 1)
-t trust network and server, no RFC-4330 recommended cross-checks

Wednesday, June 29, 2011

Flash File System ---- Linux

[1] http://en.wikipedia.org/wiki/LogFS
[2] http://en.wikipedia.org/wiki/JFFS2
[3] http://en.wikipedia.org/wiki/YAFFS
[4] http://en.wikipedia.org/wiki/Flash_file_system
[5] http://www.linux-mtd.infradead.org/faq/jffs2.html#L_bbhandle ----jffs2 trouble shotting


LOGFS IS THE FUTURE FOR BIGGER FLASH [1]
----------------------------------------
LogFS is a Linux log-structured and scalable flash filesystem, intended for use on large devices of flash memory. It is written by Jörn Engel and in part sponsored by the CE Linux Forum.

LogFS is included in the mainline Linux kernel and was introduced in version 2.6.34, released on May 16, 2010.


DISADVANTAGE OF JFFS2 [2]
-------------------------------
Disadvantages

All nodes must still be scanned at mount time. This is slow and is becoming an increasingly serious problem as flash devices scale upward into the Gigabyte range.
Writing many small blocks of data can even lead to negative compression rates, so it is essential for applications to use large write buffers.
There is no practical way to tell how much usable free space is left on a device since this depends both on how well additional data can be compressed, and the writing sequence.

Sunday, May 29, 2011

Network setting under Linux ---Embedded Linux Internet Access

[1] http://www.linuxhomenetworking.com/wiki/index.php/Quick_HOWTO_:_Ch03_:_Linux_Networking


[root@GsnCommsModule rc.d]# ifconfig -a
[root@GsnCommsModule rc.d]# cat rc.conf
all_services="mount-proc-sys mdev udev hostname devfsd depmod modules filesystems syslog network inetd portmap dropbear sshd boa smb dhcpd settime qtopia watchdog gtk2 pango"
all_services_r="pango gtk2 watchdog qtopia settime dhcpd smb boa sshd dropbear portmap inetd network syslog filesystems modules depmod devfsd hostname udev mdev mount-proc-sys"

cfg_services="mount-proc-sys mdev hostname depmod modules filesystems syslog network sshd settime "

cfg_services_r=" settime sshd network syslog filesystems modules depmod hostname mdev mount-proc-sys"

export HOSTNAME="GsnCommsModule [-m ] [options....]"
export NTP_SERVER="ntp.cs.strath.ac.uk"
export MODLIST=""
export RAMDIRS="/tmp /var"
export TMPFS="tmpfs"
export TMPFS_SIZE="512k"
export READONLY_FS=""
export INETD_ARGS=""
export BOA_ARGS=""
export SMBD_ARGS=""
export NMBD_ARGS=""
export DHCP_ARG=""
export DEPLOYMENT_STYLE="JFFS2"
export SYSCFG_DHCPC_CMD="udhcpc -b -i "
export DROPBEAR_ARGS=""
# net interface 1
export SYSCFG_IFACE1=y
export INTERFACE1="eth0"
export IPADDR1="10.10.20.89"
export NETMASK1="255.255.0.0"
export BROADCAST1="10.10.255.255"
export GATEWAY1="10.10.10.1"
export NAMESERVER1="10.10.10.1"

[root@GsnCommsModule rc.d]# source rc.local

--------------------------------------------
VIEW ROUTING TABLE

[root@GsnCommsModule rc.d]# netstat -nr
Kernel IP routing table
Destination Gateway Genmask Flags MSS Window irtt Iface
10.10.0.0 0.0.0.0 255.255.0.0 U 0 0 0 eth0
127.0.0.0 0.0.0.0 255.0.0.0 U 0 0 0 lo

------------------------------
ADD DEFAULT GATEWAY

[root@GsnCommsModule rc.d]# route add default gw 10.10.10.1 eth0

Routing table with 0.0.0.0 as destination is the default gateway.
[root@GsnCommsModule rc.d]# netstat -nr
Kernel IP routing table
Destination Gateway Genmask Flags MSS Window irtt Iface.1
10.10.0.0 10.10.10.1 255.255.255.255 UGH 0 0 0 eth0
10.10.0.0 0.0.0.0 255.255.0.0 U 0 0 0 eth0
127.0.0.0 0.0.0.0 255.0.0.0 U 0 0 0 lo
0.0.0.0 10.10.10.1 0.0.0.0 UG 0 0 0 eth0

------------------------
DELETE GATEWAY

[root@GsnCommsModule rc.d]# route del -net 10.10.0.0 netmask 255.255.255.255 gw 10.10.10.1 eth0
[root@GsnCommsModule rc.d]# netstat -nr
Kernel IP routing table
Destination Gateway Genmask Flags MSS Window irtt Iface
10.10.0.0 0.0.0.0 255.255.0.0 U 0 0 0 eth0
127.0.0.0 0.0.0.0 255.0.0.0 U 0 0 0 lo
0.0.0.0 10.10.10.1 0.0.0.0 UG 0 0 0 eth0


Monday, February 14, 2011

GPIO Interrupt in Linux

[1] http://bec-systems.com/site/281/how-to-implement-an-interrupt-driven-gpio-input-in-linux
[2] Linux Device Drivers 3rd Edition.
[3] http://blackfin.uclinux.org/gf/project/uclinux-dist/forum/?_forum_action=ForumMessageBrowse&thread_id=23417&action=ForumBrowse
[4] http://docs.blackfin.uclinux.org/doku.php?id=linux-kernel:drivers:simple-gpio
[5] http://docs.blackfin.uclinux.org/doku.php?id=linux-kernel:drivers:gpio-sysfs
[6] http://docs.blackfin.uclinux.org/doku.php?id=linux-kernel:interrupts#gpio_interrupt_processing

[7] http://osdir.com/ml/android-platform/2010-01/msg00294.html
[8] http://linux.derkeiler.com/Mailing-Lists/Kernel/2009-06/msg04562.html Proposed PATCH for Gpiolib.c/h


irqs.h (x:\lpc3250\ltib-qs\rpm\BUILD\linux-2.6.34\arch\arm\mach-lpc32xx\include\mach)
irq.c (x:\lpc3250\ltib-qs\rpm\BUILD\linux-2.6.34\arch\arm\mach-lpc32xx)
phy3250.c (x:\lpc3250\ltib-qs\rpm\BUILD\linux-2.6.34\arch\arm\mach-lpc32xx) line202 static struct amba_device lpc32xx_ssp0_device

gpiolib.c (x:\lpc3250\ltib-qs\rpm\BUILD\linux-2.6.34\arch\arm\mach-lpc32xx)line 351
static struct lpc32xx_gpio_chip lpc32xx_gpiochip[] = {
{
.chip = {
.label = "gpio_p0",
.direction_input = lpc32xx_gpio_dir_input_p012,
.get = lpc32xx_gpio_get_value_p012,
.direction_output = lpc32xx_gpio_dir_output_p012,
.set = lpc32xx_gpio_set_value_p012,
.request = lpc32xx_gpio_request,
.base = LPC32XX_GPIO_P0_GRP,
.ngpio = LPC32XX_GPIO_P0_MAX,
.names = gpio_p0_names,
.can_sleep = 0,
},
.gpio_grp = &gpio_grp_regs_p0,
},


you cannot write an IRQ handler in userspace, it needs to be in kernel space.

What you will probably end up with is a loadable kernel module containing your interrupt handler and a pseudo-file interface to the variables it manipulates. The interrupt handler executes in its own context. The pseudo-file interface will execute in the kernel context, so be careful to protect the data it shares with the interrupt handler using the appropriate semaphores. You will use file operations at the pseudo-file as a bridge from your user-space program to the kernel space variables manipulated by the interrupt handler.[3]

You will find out when you get into the literature that pseudo-files are not real files and don't have the overhead of actually writing stuff in persistent store. They are ways of using read(), write() and ioctl() functions on file handles from user space to invoke functionality in the kernel. From your application you open a file handle to your pseudo-file and when you call these functions on it code you have added to the kernel springs to life. There is a framework that takes care of the transition from user- to kernel-space. Inside the kernel, your functions can share variables with your interrupt service routine.

This is all standard Linux stuff and you may find out more from general Linux forums (in addition to the right books). [3]


[root@GsnCommsModule user]# cat /proc/interrupts
CPU0
9: 44 - serial
16: 4760671 - LPC32XX Timer Tick
20: 1018101 - pl022
21: 0 - pl022
28: 103638 - DMA
29: 901999 - eth0
50: 0 - pnx-i2c
51: 0 - pnx-i2c
52: 0 - rtc-lpc32xx
59: 216 - ohci_hcd:usb1
63: 45 - pnx-i2c
Err: 0